-
Hat tip to Raven Wing
I have noticed that some folks have a problem with their pictures/memes/images fitting properly within the comment windows. Some are too far off to the right of the window and often cuts off part of the image.
I have found a way to adjust the images to fit within the parameters of the comment window very quickly and easily. The steps below should work most of the time. And if not, let me know and I'll help you figure out now to adjust them.
1. Click on the icon next to the smiley face on the bar at the top of the comment window to open the image loader.
2. Select Upload an Image
3. In the Size dropdown list select 350px - Larger
4. Next, select 'Normal' in the Position dropdown window. This will allow you to add text or another picture below the first one if preferred.
5.Under Image click on Select and Image to upload
6. Navigate to the folder on your computer where the image you want to upload is located and click on it to load it into the comment window
7. Only part of the image will be visible at first, so click on the image to make it fill the window
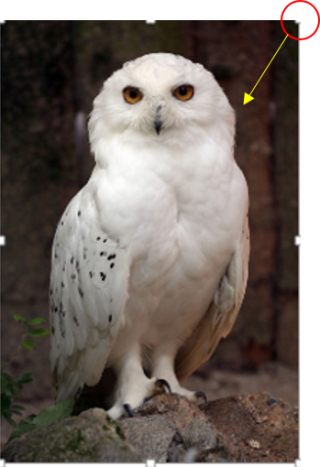
8. If the image is too big for the window and extends off the right side, click on the image to select it.
9. You will see a small square on each corner and in the middle of each side.
10. Put cursor on the square to show a double ended arrow
11. Press down on the arrow and drag it toward the center of the image until it fits in the window properly.
Continue to drag the arrow to the center until it is the right size to fit in the window.
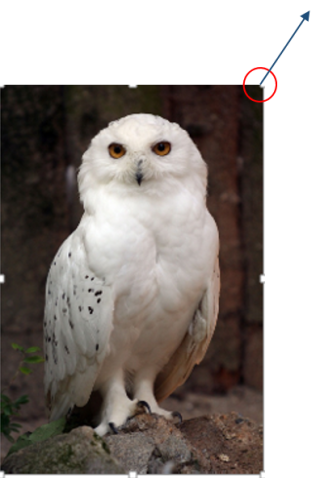
12. If the image is too small to fill the window, follow step 10, but, drag the arrow in the upward direction until the image fills the window as large as you wish.
These steps should help you get your images resized to fit in the comment window without a lot of fuss. If you need help, just let us know.
I hope this helps.
-
 When people are trying to persuade you, they sometimes reach for tricks like the 'appeal to ignorance' or 'whataboutism' to seem more convincing.

Javier HirschfeldWhen people are trying to persuade you, they sometimes reach for underhand tricks like the 'appeal to ignorance' or 'whataboutism' to seem more convincing. Amanda Ruggeri explains how to identify these logical fallacies.
Scroll social media, tune into the news, or simply raise a hot-button issue with an acquaintance, and within a matter of minutes, you're likely to encounter a trap. These traps are so time-worn that they date back to ancient Greece.
They're called logical fallacies. Simply put, a logical fallacy is a flaw in reasoning that, despite having no bearing at all on a claim's actual merit, can - very confusingly - make that claim sound more convincing.
Using a logical fallacy doesn't necessarily mean someone is wrong. It can, however, indicate either faulty thinking and flawed logic, if used unintentionally, or an attempt to manipulate the truth to be more persuasive, if used deliberately. Either way, it's a red flag that should prompt further questioning and discussion. That includes, crucially, in your own thinking - and in arguments that you're inclined to agree with.
Once you know about logical fallacies, you'll see them everywhere. Why does this matter? Because the more practised you become at spotting them, the better you can be at identifying flaws in people's thinking, and refocusing dialogue back to an argument's merit. You'll also get better at thinking critically yourself.
Here are seven fallacies to look out for. Some are errors of logic (known as "formal" fallacies), while others are about the misuse of language and evidence ("informal" fallacies) - but the consequence is always a faulty argument.

Javier Hirschfeld1. Appeal to ignorance
This is when a lack of evidence is interpreted to mean a claim is real - rather than placing the burden of proof on the person making the claim. It's a fallacy that commonly underlines arguments for conspiracy theories. Ask one of the estimated 10 million-plus people who believe that lizards run the world about the evidence for their claim, for example, and they might counter, "Well, these lizards are too clever to leave any evidence - that's what makes this situation so dangerous! How can you be sure it's not true?" You might wind up scratching your head, but, hopefully, it's not because you've been persuaded; it's because they've set you the trap of the "appeal to ignorance" fallacy.
2. Ad hominem
This is a fallacy in which a claim is rejected on the basis of an aspect of someone's character, identity, motivations, or even the relationships they have with others. Think of the health professional who is told that they are only recommending vaccines because they must be a shill for Big Pharma, or the research of climate scientists being dismissed on the basis that they must be ideologically motivated. The most obvious (and absurd) kind of ad hominem, though, is the sort that not only attacks a person instead of dealing with their argument, but goes after something completely irrelevant to the topic at hand - like a political candidate in a TV debate saying their opponent's clothing choices, golf prowess or hairstyle mean they can't possibly be a good leader.

Javier Hirschfeld3. Slippery slope
This is the argument that taking one step, or putting into place one measure, will inevitably lead to more and more drastic measures - like an object sliding down a slippery slope. It's particularly common in debates over policy. Think of the argument that some opponents of same-sex marriage made against legalising it in places like the US or Europe. In 2016, researchers at the University of California, Los Angeles found that many people who were against the policy were persuaded by the argument that it would lead to greater sexual promiscuity across society, and threaten their own way of life. This particular argument is fallacious because, rather than debating the policy change itself (whether same-sex marriage should be legalised), the policy was dismissed because of the fear of its predicted outcome (the breakdown of traditional society).
4. Strawman
I see this one on social media, especially, all the time. It's misrepresenting the argument of the other side to make it seem more ridiculous, and therefore easy to defeat. Think of someone who puts forth a nuanced argument that excessive sugar intake may raise the risk of health issues like heart disease. A strawman response would be, "Oh, so what, sugar is killing everyone and should be outlawed? That's absurd!" This distorts the original argument, making it easier to defeat - a strawman. One intriguing way to not only fight this tendency, but sharpen your own thinking, is to try a "steelman": you present your opponent's argument in the best possible way (perhaps even better than they have themselves) before you state why you disagree.

Javier Hirschfeld5. Appeal to authority
This pernicious argument holds that someone's credentials, fame or reputation alone prove that they must be right. If people perceive someone as an authority, they have an innate cognitive bias to assume they have expertise in all things (even subjects they have no background in). Like many logical fallacies, it feels like it could, or should, be relevant: if someone has credentials and expertise in a certain area, shouldn't their opinion on that area be more trustworthy? To be clear, it should. What makes this a fallacy is when someone buys into an argument solely because of who the person is, rather than because of the argument's evidence or reasoning.
More problematic still is the version known as "appeal to irrelevant authority". Our tendency to believe something because, say, a celebrity states it, even if they have no expertise at all in the topic at hand - a classic tendency in today's influencer-obsessed world. But "irrelevant authorities" aren't always so obvious. Take arguments about climate change, for example, when sceptics quote someone like a theoretical physicist as an expert - despite the fact that theoretical physics generally has very little to do with climate science.
6. False dichotomy
Presenting a complex scenario as if there are only two either-or, often opposing options, rather than multiple options. Think of that famous, often-recycled and even ancient phrase, famously used by President George W Bush shortly after 9/11: "You're either with us or against us." It implied to the international community that they had only two options - back the United States completely, including in its invasion of Afghanistan, or consider themselves enemies. In reality, of course, there were a spectrum of other options nations could take, and kinds of allies (or enemies) they could be.

Javier Hirschfeld7. Whataboutism (also called whataboutery)
Sometimes considered a type of red herring - a logical fallacy that uses unrelated information to redirect away from the argument's flaws - whataboutism is intended to distract attention. It describes when, normally in response to an accusation or a question, someone responds with their own accusation. In an argument with a partner, for example, you might say, "It hurt my feelings when you did X." A whataboutism response might be "Well, you never take out the trash!"
How not to be manipulated
In today's onslaught of overwhelming information (and misinformation), it can be difficult to know who to trust. In this column , Amanda Ruggeri explores smart, thoughtful ways to navigate the noise. Drawing on insights from psychology, social science and media literacy, it offers practical advice, new ideas and evidence-based solutions for how to be a wiser, more discerning critical thinker.
In politics, one of the most infamous examples has been when Russia is accused of human rights violations, and its leaders respond "Well, what about the West?". While a whataboutism can serve to illustrate hypocrisy, it deflects from the original argument. Two wrongs don't make a right, but a whataboutism can make it seem like they do.
Understanding and spotting logical fallacies like this these can be a really useful way to think critically about what you read or watch, and steer (and keep) conversations back on track.
However, because we started this with talk of nuance, let's underscore: if someone uses a logical fallacy, it doesn't necessarily mean their conclusion is incorrect. That, in fact, would be its own fallacy, and perhaps my favourite one of all: the "fallacy fallacy".
Amanda Ruggeri is an award-winning science and features journalist. She posts about expertise, media literacy and more on Instagram at @mandyruggeri .
-
Hat tip to TIG
Recently Newstalkers installed a set of features designed to improve the user experience. The most visible of these are:
- Reply with Quote
- Quote toolbar (and other editor enhancements)
- Automatic comment backlinks
Consider this a brief introduction to how these features work and their intended use.
Background
A number of social media sites have moved to a limited form of commenting. Basically single-threaded, minimal editing. This enables site owners to control the look of the site (by constraining the comment styles). Unfortunately this control stifles discussion. People have a hard time tracing through the long list of messages to understand the discussions. In result, comments are generally minimal - discussions are difficult to find.
NewsTalkers is a discussion site. Its main purpose is to provide a forum where people can engage in thoughtful, civil discourse on all topics. As such, it has and will continue to enhance its user experience in support of discussions. This includes authorship, seeding, commenting, tracking, replies and following.
With that brief background, let's move to the new features.
Reply With Quote
In discussions, one often finds an aspect on which to comment. To illustrate the aspect the common practice is to provide a quote to serve as the context for the reply. Since this is such a common practice it is very convenient if the site provides a simple method for accomplishing this.
Reply-with-Quote (RwQ) is an enhancement to the REPLY button. One selects the portion of a comment that is to be quoted and then presses REPLY. RwQ captures the selected text, automatically formats it as a quote and positions the user to the next line to start typing their reply. When posted, the quote will be adorned with a gray box to distinguish it as a quote (and also to provide contrast with the actual reply so that the reply stands out).
In short, if one wishes to reply to a portion of a comment, one selects the desired portion and presses REPLY. The rest is automatic.
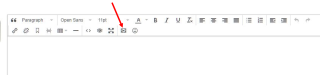
Quote
The Quote toolbar button is a function of the editor. It is the first button on the editor toolbar:
Its purpose is to let the author manually quote text. This can be text pasted in from an external site, from another comment or simply typed by the author. The RwQ functionality discussed above works for your opening quote; subsequent quotes are adorned as such by using the Quote button.
To manually quote, click on a paragraph you wish to quote and press the Quote button. The editor will indent the paragraph to visually note that it is now a quote. When you post, the paragraph will be styled in a gray block quote box just like RwQ.
Note that if you have your cursor positioned in or at the end of a quoted paragraph, hitting ENTER will continue the quote . Visibly, the editor will remain in an indented mode. To exit the quote simply press the Quote button on the toolbar. That will turn off Quote and return you to normal editing. The Quote button is simply a toggle: quote-on or quote-off.
Other Editor Features
The editor now has more features for editing such as fontsize. This enhances one's ability to be expressive in a comment but it runs the risk of making the site ugly. Ultimately all users contribute to the look of the site by the styling of their comments. Take care to ensure your highly stylized comment is not gaudy (e.g. inappropriately sized text, use of many colors or fonts, using the Quote button as a style, etc.)
Automatic Comment Backlinks
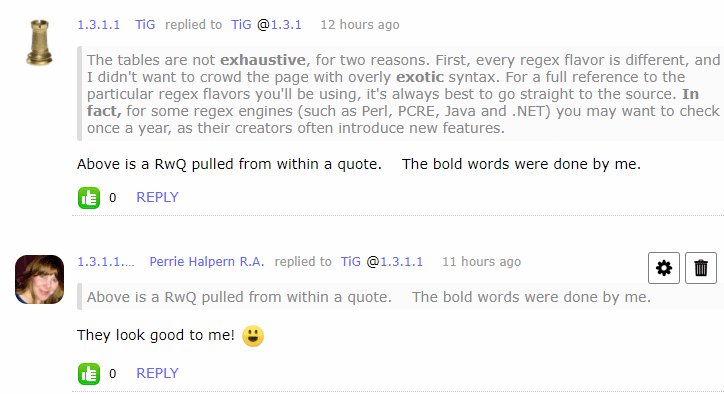
When one replies to a comment, NewsTalkers will automatically record special information to link comments in logical threads. This feature makes use of the fact that every comment has its own unique identity (a URL). Each reply comment will have a link to its source comment. Clicking on this link will automatically navigate to the source comment (auto scroll so that the desired comment is at the top of your browser window). Note the following exchange:
Perrie selected my words "Above is a RwQ pulled from within a quote. The bold words were done by me." and pressed REPLY and then entered her comments. Note that at the top Perrie's comment has her comment ID, her name, the user she replied to (TiG) and the comment she replied to (@1.3.1.1). If Perrie (or anyone actually) clicked on the 1.3.1.1 the comments will scroll to that comment. (In this example the scrolling is simple, but sometimes the source comment is quite a distance away.)
One can also click on the comment ID. Clicking on the 1.3.1.1 ID for the comment by TiG will scroll that comment to the top. Similarly, one can copy the hyperlink (Copy Link Address) and use it elsewhere.
Finally clicking on Perrie's or TiG's names will navigate to their respective profile areas.
Hierarchic Numbering
To give even more information regarding threads, comments are numbered in a hierachic fashion. A comment that is not a reply will have a simple integer, 1, 2, 3, ... However, a reply to comment #2 will be adorned as 2.1, 2.2, ... Replies to 2.2 will show as 2.2.1, 2.2.2, ... The hierarchic numbering is limited to 4 levels since the value quickly diminishes as the numbers grow large. A future enhancement (deferred due to the amount of change required) will employ a different comment structure with two or three levels of nesting followed by a linear stream of comments. That is, nesting stops after three levels and reverts to a simple list.
(Hierarchic numbering only engages on articles published after the enhancements were installed.)
Editing Backlink
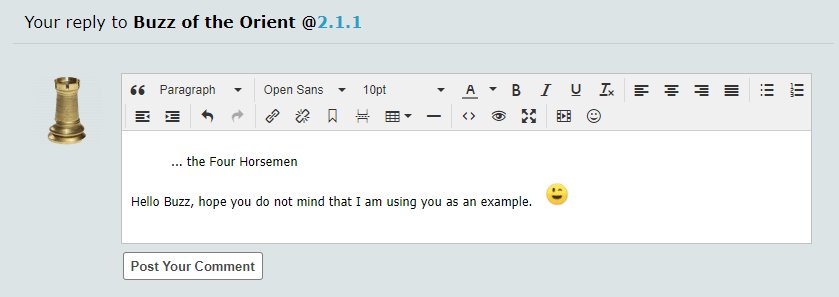
Another convenience is the automatic backlink while positioned within the editor.
Sometimes one needs to return to a source comment while authoring a reply. One may want to copy more text or simply re-read to ensure understanding. To return to the source comment, simply click on the backlink. In this case, one clicks on the @2.1.1 backlink. This will auto scroll to bring Buzz' 2.1.1 to the top of the window. To return to the editor, scroll down to the bottom (the editor is always at the bottom in normal discussions) and continue authoring the reply.
Summary
The purpose for this opening round of enhancements is to make it easier to engage each other in discussion and to provide more avenues for expression. It is up to all users to use these features intelligently. They can make the site pretty and easy to read or they can make it look ugly and confusing. The hope is that the open styling approach of NewsTalkers will produce an inviting environment that encourages (rather than dissuades) discussion.
-
Hat tip to Raven Wing
Download Video to your Computer hard drive
In NT, go to your own Member name at the right of the top of the page to open your own Home page
Click on Video on the tab bar
Then click on the + icon to the far right on the blue VIDEO bar to open the window to create the video
Give the Video a name on the Name bar
If you want to create an album of videos, then give the Album a name
Then next to the Video file name click on Upload a New Video
When the Video link is loaded, click on the Create tab at the bottom to create the video.
Then navigate to the folder where you have your video and select the video you want to post
NOTE : the video extensions must be such as .wmv, mpg, etc. so that it will be accepted. If it is not, there will be a list of sample video extensions that it will accept
Once you have posted the video, it may take a few minutes for it to show up in the comment window, depending on your upload speed with your Internet provider.
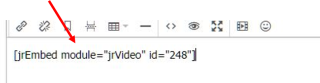
After a few minutes go to the comment window where you want to post the video and click on the Media icon next to the Smiley icon to open the Media window.
Then select Video on the top bar.
Once it opens you should see your video listed there with your name. If not, check back in a few minutes to see if your video is there yet, as it may take several minutes to show up.
When you see your video listed there with your name, click on the Embed This Media tab to the right of your video and name to embed the video in the comment window. You will see only the link to the video and not the video itself at this point.
You will see only the link to the video and not the video itself at this point.
Then Post your comment and the video should appear.
I hope this helps.
-
The new trending articles widget shows the topmost (currently 5) ranked articles based on certain criteria. The highest ranked articles are popular (evidenced by the Like count) and engage the community (evidenced by timely comments). Original work will have a more favorable ranking than a seed.
To help them ' get legs ', new articles are artificially bumped in rankings. Once an article ages past the system's age threshold it will compete with other articles on equal footing. So the idea should be to promote one's article while it is young and encourage people to like it and enter comments .